
When Christmas comes near, your house often fills up with folks. You get extra visitors. You have more showers. And you put lots of strain on the bathroom. If the old valve jams, drips, or sends quick heat shifts, it tends to happen just as people stay over. Putting in a fresh concealed shower valve before the big day is a wise move. It helps dodge quick fixes. And it makes the shower seem neater and simpler to handle.
This guide shows you the main steps to set up a concealed shower valve in an easy, plain way. It is not a complete plumbing course on one sheet. But it aids you in chatting with your worker. It lets you spot poor jobs. And it helps you pick which bits you can do safely and which ones are best for an expert.
Introduction
A concealed shower valve tucks the key valve part and tubes inside the wall. So you just see a cover plate and a knob. The shower appears cleaner. And there is less metal to knock into in a small spot. Near Christmas, when guests drop by, a steady, tidy shower is more than a good add-on. It cuts down gripes. It saves minutes. And it makes your place feel set for company.
Before you mess with any tubes, you need a solid plan. You need the correct tools. And you need some calm. If you still wonder if you like a tucked system or one on the wall, you can check a match-up of a concealed vs an exposed shower mixer. Then return to this setup guide.
Tools and Materials You Need for a Holiday-Ready Installation
You do not need a whole shop to deal with a concealed shower valve. But you do need simple tools and the right parts. Gathering all before you begin is key. This matters most when you work in the brief time before guests show up.
Basic Tools for Shower Valve Installation
For most tasks, you will grab a level tool, twist wrench, tube cutter or blade, screw turner, measure tape, and a pen or mark for outline lines. A tiny light or lamp aids when you peek into the wall hole. Having a pail and some worn cloths close by is smart too. Even a little water can spill quickly on a bath floor.
Materials and Plumbing Accessories
You also need tube joins that fit your setup, seal tape, hold screws, and wall stops. If your new valve has a concealed shower valve with a box, you should look at the depth span in the info sheet. This box shields the valve part. And it helps place the right spot in the wall. This counts a bunch when you later add tiles and covers.
Step 1 – Plan the Valve Position Before Your Guests Arrive
A tiny plan slip can lead to a big mess once the wall shuts. Around the holidays, you often lack time to rip the wall twice. So it is worth going slow here. Even if the clock ticks fast.
Check Wall Cavity Depth
First, gauge the depth of the wall where you aim to put the concealed shower valve. The hole must hold enough room for the body and the box. It should not shove the cover plate too far out. Or yank it too far in. You can match the real depth at the spot with the depth span on the valve or in the directions. If the wall is too slim, you might add a little fake wall. Or shift the setup. Do not push the valve into a spot that fails to fit.
Mark Height and Centerline
Next, pick the height of the valve. Many folks set it between chest and arm level. So grown-ups can grab it easily. While the knob stays clear of the straight water rush. Use a level tool to draw a plain flat line and a up-down center line. These marks lead you when you slice the gap. And later, when you line up the box.
Step 2 – Install the Concealed Box Securely
Once you pick where the valve rests, you can slice the wall and fix the box. This bit lays the ground for all that comes next. So it is worth making it even and firm.
Cut the Wall Opening
Slice the gap based on the size of the valve body or the given shape. Aim to keep the slice neat. And skip making the hole way bigger than required. Be careful not to strike any hid wires or old tubes. If you doubt what hidden behind the tile or panel, it is safer to make a small peek hole first. Look inside before you go for the full slice.
Fix the Concealed Box in the Wall
Put the box in the hole. Line it with the height and center marks. Grab the level tool again. Make the front side straight both flat and up-down. Then lock it with screws and fit wall stops or holders. For setups that work as a wall-mounted shower valve, this step counts a ton. Any slant will appear at the cover plate. And it will make the knob feel weird.
Step 3 – Connect Hot and Cold Water Lines
With the box locked, you can link the feed lines. This is the bit many folks fret over. And for good cause. A slip here can bring drips or swapped heat control.
Follow the Hot-Left, Cold-Right Standard
Most concealed shower valve bodies follow the same guide: hot water on the left, cold on the right. Look at the signs on the valve shape or the book. Link the hot and cold tubes to the match inlets. In a chill time, it is simple to sense which tube holds hot water. But you should still check with the system open before you seal the wall.
Run a Quick Leak Test
When all joins are snug, ease open the main feed. Check for drips around each link. It aids in putting dry paper or cloth around the joints. Even a tiny drop will show as a dark spot. Let the water flow for a brief time to push out air from the lines. If any bit looks wrong, mend it now. Not after you tile.
Step 4 – Install Diverter and Outlet Pipes
If your concealed valve sends to more than one spot, you need to link the switch and out tubes at this point. This shows up often when you set up a top shower and a hand spray.
Route Pipes to Rain Shower and Hand Shower
Plan even, held runs for the out tubes. Use as few sharp turns as you can. One run will climb to the top shower. And one will drop or side to the hand spray point. A dual-function concealed shower valve is often plenty for a family bath that needs two spots. It skips turning the wall into a tangle of tubes.
Keep All Pipes Clean Before Closing
Before you shut the wall, rinse the lines quickly to clear dust or metal bits. Tiny grains can harm the valve part or jam the shower head later. It might seem like a minor thing. But fixing a jammed shower on Christmas Eve is no joy for anyone.
Step 5 – Apply Waterproofing and Close the Wall
Once the tubes and valve links sit in place, you can rebuild the wall top. Good water shield guards both the wall and the concealed shower valve.
Waterproofing Layer and Tile Prep
Put a fit water shield layer around the valve spot and along near joins. Follow local ways. Give extra care to corners and any screw gaps. After the shield hardens, you can lock the back panel or tiles. Keep the valve gap clear. Cut the tile gap neatly so the cover plate will rest flat later.
Leave the Service Opening Accessible
Do not hide the valve behind a wee hole that just lets the part pass. The box and valve front should stay reachable from the done side. This keeps later fixes easy. It matters when you count on this shower during rush times.

Step 6 – Install Trim Plate and Handle
When the wall top is full and dry, you can fit the seen bits of the concealed shower valve. This is the part guests will spot. So a touch of care helps a bunch.
Adjust Temperature and Flow
Fit the cover plate, knob, and any hide pieces based on the directions. Open the water once more. Check heat and flow. Some valves let you set a halt point so the knob cannot swing past a set hot mark. This can help in a home with kids or older folks. Mainly in winter when people crave hotter showers.
Clean the Plate and Remove Installation Dust
Wipe away finger marks, dust, and tiny bits of grout or glue from the cover and knob. It is a small task. But it aids the shower to look new when guests step in. At this spot, your concealed shower valve should feel easy to use. It should have plain switches between spots. And no odd sounds in the tubes.
Step 7 – Final System Testing Before the Holiday
A brief last check now can guard your holiday plan later. It is better to spot a weak bit on a calm day than when many folks wait for a shower.
Test Flow, Pressure, and Temperature
Run the shower for a few moments on each spot. Try various flow amounts and heat sets. Hear for water bang, loud shake, or long waits in hot water. If anything feels off, you can still tweak or call aid while time lasts.
Common Mistakes to Avoid During Holiday Preparation
The top slips with a concealed shower valve are basic: bad depth, weak joins, no push check, or hurrying to shut the wall. When you feel rushed, you might skip steps. Around Christmas, this risks much. Even a small drip behind the wall can spread fast while the house is packed full.
When to Call a Professional During the Christmas Season
If your walls run very slim, if the old tubes are badly rusted, or if you feel unsure about push and local rules, it is better to fetch a trained plumber. You can still use this guide as a list. Talk through each step. That way you hold the reins of the task without grabbing work that seems risky or too hard.
Conclusion
Setting a concealed shower valve ready before guests come aids your bathroom dealing with the extra rush of the holiday time. With a plain plan, the right tools, and careful looks at each point, the shower can feel simple and quiet to use. Even when the rest of the house buzzes. If you still weigh a hid valve against a top-mounted choice, taking a closer peek at a concealed vs exposed shower mixer is a fine last move before you pick.
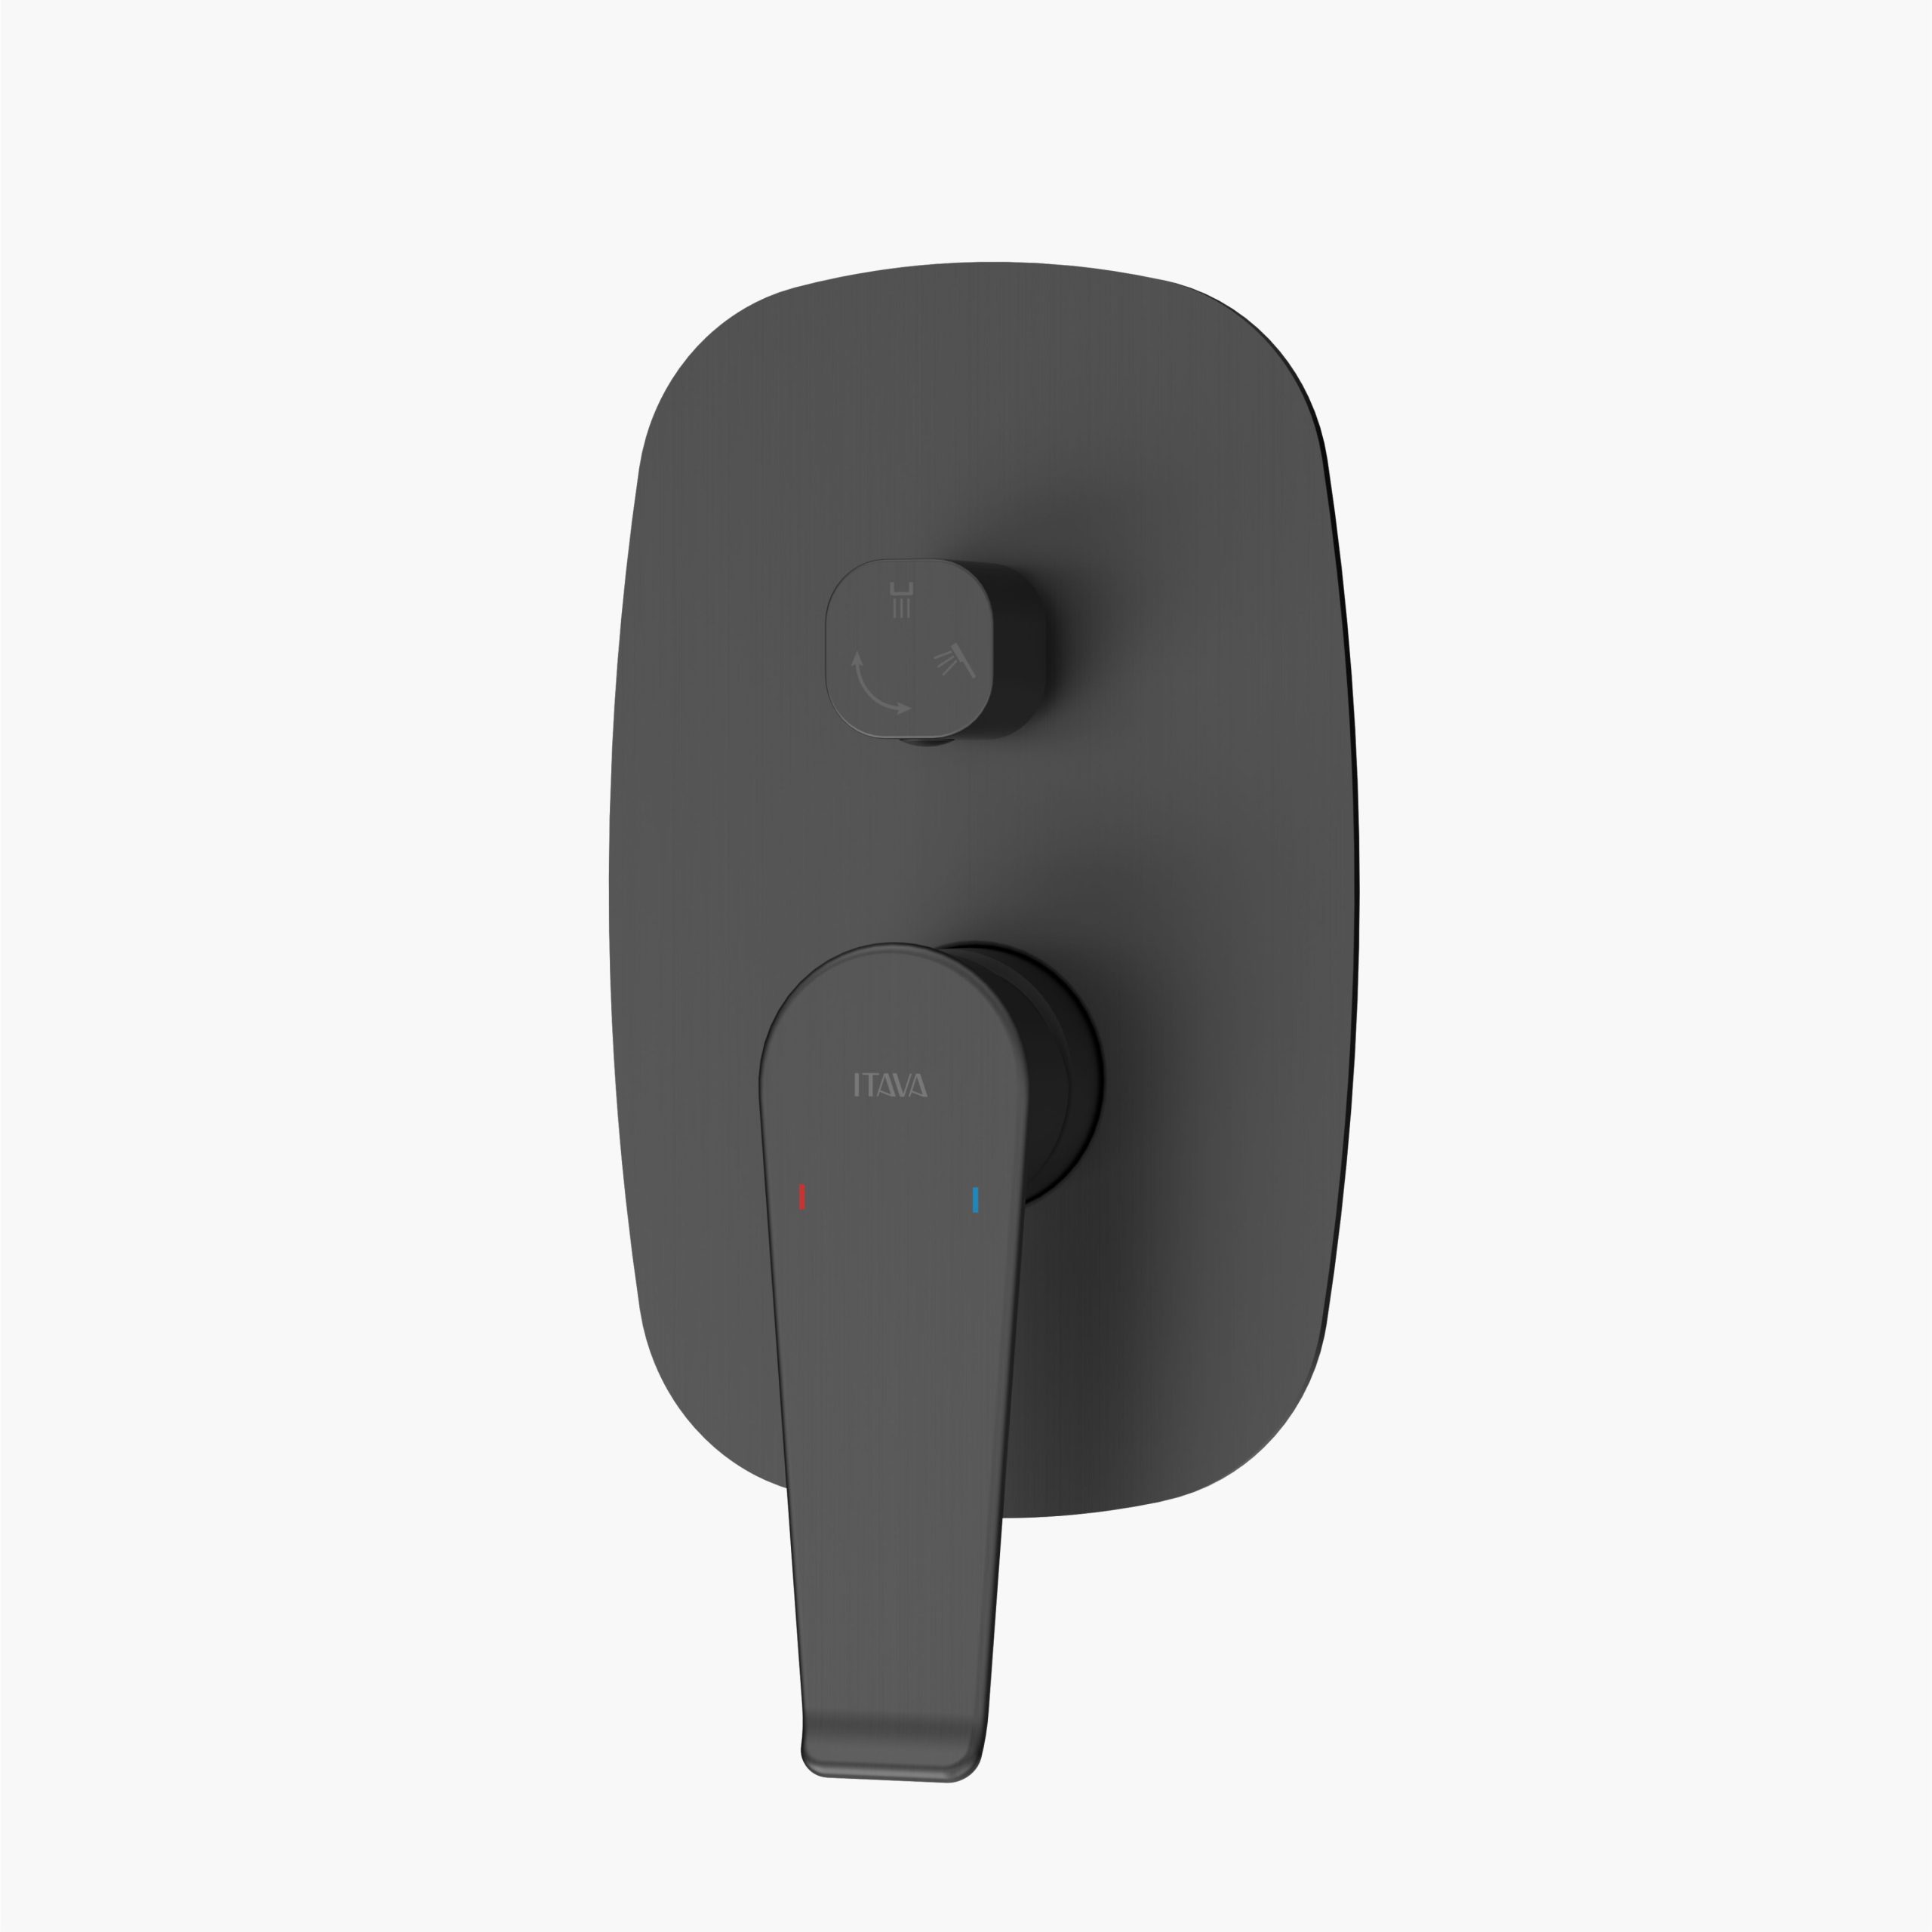
ITAVA: Your Shower Mixer Partner
ITAVA is a custom kitchen and bathroom brand that focuses on global design trends, offering a complete range of kitchen and bathroom products that can be fully matched, from faucets, shower heads, toilets to washbasins, bathroom cabinets and accessories. The design pursues simple and balanced lines and proportions, suitable for different Spaces of modern apartments and spacious residences.
Under the simple appearance, we also pay attention to the details of daily use:
- Whether the handle turns smoothly and clearly
- Whether the water output is gentle and stable
- Is the surface easy to clean and maintain
If you are planning to renovate your bathroom or carry out a complete makeover during the holiday, ITAVA can be a reliable basic option for you – helping to create a quiet, comfortable and well-viewed space that remains calm even when guests visit.
FAQ
Q1: Is a concealed shower valve too hard to install for a normal homeowner?
A: Some steps, like cutting the wall and joining pipes, can be done by a careful DIY user with the right tools. But if you do not feel confident with plumbing work, it is safer to let a professional handle the connections while you focus on planning, layout, and finishing.
Q2: How deep should a concealed shower valve be inside the wall?
A: Every valve has a marked depth range, usually shown on the body or in the manual. The front face of the valve or box should sit within that range once tiles or panels are added. If it is too deep or too shallow, the trim may not sit flat and the handle may not move smoothly.
Q3: Do you always need waterproofing behind a concealed shower valve?
A: Yes, you should have a proper waterproof layer in the shower area, including around the valve opening. This helps protect the wall from splashes and any small leaks. It is a basic part of a modern shower build, not an extra step.
Q4: Can a concealed shower valve be repaired without breaking tiles?
A: In most modern systems, the front opening and box are designed so you can remove the trim and reach the cartridge from the finished side. As long as the original installation left enough access, many repairs can be done without taking tiles off the wall.
Q5: Why is it better to install or replace a concealed valve before Christmas instead of waiting?
A: During the holidays, more people use the shower, so any weak point will show up faster. Fixing leaks or temperature problems when the house is full is stressful. Doing the work before guests arrive gives you time to test the system and enjoy the season without worrying about bathroom failures.